Assembling your own computer is an excellent way to get a customized system, that meets your unique requirements. You may select the components that most closely match your budget and desired performance, and the satisfaction of building a working computer from starting up is unique. But before finishing, it is essential to have an understanding of the core process assembly.
We will explain step by step process of how to assemble a computer. This includes choosing the right components, preparing for assembly, putting the computer together, and testing. We’ll also give examples to help you understand the process.
1.Choosing the Right Components
The first step in building a personal computer is selecting the proper parts. You should now be understanding the most essential factors and what to look for to make a purchase.
Below is the list of parts required to Assemble a Complete Computer System
Note : A graphics card is not required if you building a basic personal computer. But a graphics card is essential if you are building a gaming PC. In addition, GPU is also very important in that some Intel F series processors ( Which come with non-inbuild Graphic cards) do not come with a display without a graphics card.1. Processor ( CPU )
2. Motherboard
3. Ram (Memory)
4. Storage ( SSD / Hard Disk)
5. Power Supply Unit ( PSU / SMPS )
6. Case ( Cabinet )
7. Graphic Card ( GPU ) (Optional)
8. Keyboard
9. Mouse
10. Monitor
11. Cables and Connectors
12. Wifi Adapter (Optional)
13. UPS ( Uninterruptible Power Supply)
14. Speaker (Optional)
Processor ( CPU )
The processor is the brain of the computer. It’s responsible for executing commands and calculations. When choosing a CPU pay attention to the number of cores, clock speed, and thermal power rating (TDP). Also, check the CPU is compatible with the motherboard you choose.
Finding the right Processor (CPU) for your computer might be difficult because there are so many possibilities with varied features and costs. When choosing a CPU keep the following things in mind:
- Usage: The first thing is what you plan to use the computer for. If you are a gamer or video editor will need a CPU with high clock speeds and multiple cores. On the other side if you use the computer for basic tasks like web browsing and word processing a low-end CPU is more than enough.
- Compatibility: Make sure, the CPU you choose is compatible with your motherboard. This information can be found in the motherboard manual or website.
- Clock Speed: A higher clock frequency usually means higher performance, but also higher power consumption and heat generation. The clock speed of a CPU is measured in gigahertz and indicates how many cycles the CPU can execute in one second.
- Number Of Cores: A CPU with many cores does multiple tasks at once. Making it suitable for multitasking and demanding activities like gaming and video editing.
- Cache: The CPU cache is a small of memory integrated into the CPU that is used for storing commonly used data. A bigger cache can enhance speed for data-intensive operations.
- Budget: Finally, think about your budget. Higher-end CPUs with more complex capabilities are more expensive. So you need to consider how much you are to spend on CPUs.
By considering these It is also a good idea to read reviews and benchmarks to get an idea of how a CPU performs in real-world scenarios.
Motherboard
The motherboard is the main circuit board that connects all of the computer components. Consider the CPU socket type, form factor, chipset, and services such as built Wi-Fi and Bluetooth when buying a motherboard.
To choose the best motherboard some important things to consider:
- Compatibility: Ensure the motherboard is compatible with your chosen CPU, RAM, and other components. Check the socket type, supported generations, and maximum RAM capacity.
- Form Factor: Consider the form factor of the motherboard, which impacts its size and compatibility with your computer case. ATX, Micro-ATX, and Mini-ITX are some common popular form factors.
- Chipset: The motherboard’s chipset determines its features and capabilities. Different chipsets provide varying amounts of performance, connectivity, and overclocking possibilities.
- RAM Support: Examine the motherboard’s compatibility with the RAM type, speed, and maximum capacity that you want. Make sure it can handle the quantity of RAM you need to install.
- Expansion Slot: Look for a sufficient quantity of expansion slots to satisfy your requirements. These slots enable the installation of additional components like graphics cards, sound cards, or storage devices.
- Storage Option: Check to see if the motherboard supports the storage devices you want, such as SSDs or HDDs. Check for M.2 slots, SATA connections, and RAID capacity, if applicable.
- Connectivity: Check that the motherboard has the essential connectivity choices for your needs. Ethernet ports, audio jacks, and other connectors that match your requirements. Check features like USB 3.0/3.1, USB-C, and Wi-Fi capabilities.
- Power delivery and cooling Section: If you intend to overclock your CPU or employ power-hungry components, look for a motherboard featuring strong power delivery systems and effective cooling options.
- Brand and Reliability: Look into the reputation and reliability of different motherboard brands. Look for customer reviews and consider warranties and customer support.
- Budget: Determine your budget and find a motherboard that is within your price range. Which offers the best of features, performance, and affordability.
By carefully examining these critical elements, provides the necessary functionality and connection, and matches your budget. To make an informed decision and establish a solid basis for your computer construction, it is critical to undertake extensive research and read reviews.
RAM ( Memory )
RAM ( Random Access Memory ) is a type of temporary storage memory used by computers to store data and instructions. Check the quantity, speed, and compatibility with the motherboard while selecting RAM.
When choosing the best RAM, consider the following five essential points:
- Compatibility: Check the RAM is compatible with the motherboard. Check the supported RAM type (e.g., DDR3, DDR4), speed, and maximum capacity listed by your motherboard.
- Capacity: Determine the size of RAM you need based on your computer usage. For general multitasking and everyday computing, 8GB to 16GB is sufficient. For more demanding tasks like video editing or gaming, choose 16GB to 32GB or even higher capacities.
- Speed: RAM speed, defined in megahertz (MHz), increases the data transfer rate. Higher speeds result in speedier performance. Check the manual of your motherboard to ensure that the RAM speed you want is supported.
- Latency: In order to increase response times, look for RAM modules with lower latency timings (CL). Lower CL numbers, such as CL14 or CL16, indicate superior performance.
- Brand and reliability: Select reputable RAM brands that are well-known for their dependability and quality. Examine customer feedback, warranties, and RAM from reputable manufacturers.
By considering these factors seriously – it is critical to verify compatibility with your motherboard, select the right capacity and speed for your needs, and pick trusted manufacturers to offer a reliable and effective computing experience.
Right Storage Choose
Storage is where your files and programs are kept. There are two forms of storage hard disc drives HDD and solid-state drives SSD. Consider the capacity, speed, and interface (SATA or NVMe) when purchasing storage.
Choosing the best storage there are a few factors to consider:
- Storage Type: Choose from Solid State Drives SSD and Hard Disc Drives HDD. SSD gives a faster performance, faster boot times, and quicker operation, whilst HDD provides bigger storage capacities at a lower cost.
- Capacity: How much data is stored in storage, Consider the size of your operating system, apps, files, and any future expansion needs. Choose a storage capacity that meets your demands without costing too much.
- Speed: If you need the best speed, choose an SSD. SSD has faster read and write speeds, resulting in quicker file transfers and improved system responsiveness. But, if you have a large amount of data to store and speed is not a primary concern, HDD can offer sufficient performance at a more affordable price.
- Reliability: Consider the quality of the storage choice you select. Look for notable companies and study customer reviews to assess their track record for durability and data integrity. Reliability is essential for ensuring the safety of your valuable files and information.
- Budget: Determine your storage budget and the best balance of capacity, speed, and cost. SSDs are often more expensive per gigabyte than HDDs, so examine your budget and arrange your storage requirements accordingly.
Power Supply Unit (PSU / SMPS)
The power supply unit powers all of the computer’s components. Consider the wattage, efficiency rating, and certification when purchasing a power supply. Ensure that the power supply has enough connectors for all of the components are using.
Consider the following factors while deciding on the Power Supply Unit or Switched-Mode Power Supply for your computer:
- Wattage : Determine the power requirements of your computer components. Add up the power consumption of using the peripherals. Select PSU with a wattage that meets or exceeds the total power requirement. Having some space is recommended for future upgrades.
- Efficience: Choose power supplies that have a high energy efficiency rating. The 80 PLUS certification is a widely accepted standard for assessing power supply efficiency. Higher efficiency implies that less power is wasted as heat, which results in cheaper electricity costs and a more environmentally friendly system. A PSU with at least 80 PLUS Bronze certifications or above is preferable.
- Quality abd Reability : Purchase a high-quality power supply from a reputed brand. Consider well-known manufacturers such as Corsair, EVGA, Gigabyte, Antec and Thermaltake. Read reviews, look at user ratings, and think about the manufacturer’s guarantee. A quality power supply offers consistent power delivery and protects your components.
- From Factor and Compability : Choose the power supply form factor of your computer that matches the cases, such as ATX, Micro-ATX, or SFX. Check the specifications of your case and motherboard for compatibility. In addition, consider the dimensions and available space inside your case for efficient installation.
- Connector and cable Management : Verify that the power supply has the important connectors to support your components, such as SATA, PCIe, and CPU power connectors. Consider the cable control options provided by the power supply. Modular power supplies contain detachable cables that allow you to connect only the ones you need, reducing cable clutter and enhancing ventilation and ease of installation.
- Protection Features : Choose safety features PSUs with overload protection, overvoltage protection, under voltage protection, and short-circuit protection. These features protect your components from potential damage caused by power fluctuations or electrical problems.
- Budget : When picking a power supply, keep your budget in mind. While it is critical not to compromise on quality and dependability, there are solutions at varying price points. Select the best power supply for your budget and needs.
Case ( Cabinet )
The case is the frame that houses all of the computer’s components. Consider the form factor, size, and features such as cable management and fan mounts when selecting a case. Additionally, ensure that the case is compatible with the motherboard and GPU.
Consider the following factors while deciding on the case or cabinet for your computer:
- From factor and Compability : Your motherboard from factor is determined whether ATX, Micro-ATX, or Mini-ITX. Select a case that is suitable with the form factor for the motherboard to ensure suitable hardware fitting and placement.
- Size and Dimension : Consider the case’s dimensions and size. Make sure it has enough room for your components, including the motherboard, graphics card, CPU cooling, and storage discs. Double-check the maximum supported dimensions for CPU coolers and graphics cards.
- Cooling and Airflow : Look for a case with good cooling and ventilation. Consider the quantity and size of fan mounts, the existence of dust filters, and the option of installing extra cooling solutions such as liquid coolers for proper cooling.
- Find a case with good cooling and ventilation. Consider the quantity and size of fan mounts, the existence of dust filters, and the option of installing extra cooling solutions such as liquid coolers. Proper cooling helps in maintaining optimal functioning and increasing the life of your components.
- Expension and drive tray : Decide the number of expansion slots and drive trays you require. Check that the case has enough expansion slots for your graphics card, sound card, and other expansion cards. Check for sufficient number of drive trays both 2.5-inch and 3.5-inch to fit your storage devices.
- Build Quality and Function : Choose a case composed of high-quality materials to ensure durability and durability. Look for features like cable management, tool-free installation procedures, and detachable dust filters. These qualities add to the simplicity of installation, maintenance, and general cleanliness of your system.
When purchasing a case, keep your budget and personal is in mind. Read reviews, check user ratings, and compare different models to get the best case that suits your demands in terms of form factor compatibility.
Graphic Card ( GPU ) Optional
The GPU or graphics card, is in charge of rendering images and videos. A decent GPU is vital when creating a gaming PC or a workstation for video editing. Consider the brand, model, VRAM, and clock speed when purchasing a GPU. Ensure GPU is compatible with the motherboard and power supply.
Choose the best graphics card for your desktop computer, consider the following factors:
- Performance : For your specific use case choose the performance range required. A mid-range GPU is perfect if you’re a casual user or only use your computer for office duties and web browsing. Big-performance GPU is required for gaming or video editing or 3D rendering.
- Compability : Check the GPU compatibility with your computer motherboard and power supply. Check that your motherboard has the requisite PCIe slot for the GPU and that your power supply can give enough power to support it.
- Spend Money : Set a spending limit for your GPU purchase. Graphics cards are available at many kinds of rates, so you must first decide how much you are ready to spend. Consider the performance-to-price ratio and seek out GPUs that provide the most return on your money.
- VRAM and Memory Bandwidth : Consider the VRAM (Video RAM) capacity and memory bandwidth of the GPU. Higher VRAM and memory bandwidth result in overall better performance, particularly in graphics-intensive applications.
- Cooling and Noise : Consider the graphics card cooling solution. Models with effective cooling systems, such as many fans or innovative heatsink designs. This helps to keep temperatures low and provides consistent performance. Check reviews and user input for noise levels created by the GPU when it is under load, as some models may be noisier than others.
- Brand and review : Research several GPU brands and models to obtain dependable solutions. Nvidia and AMD are popular GPU manufacturers. Look for reviews and user feedback to acquire insights into the performance, dependability, and consumer happiness of specific models.
By taking all of this seriously, you may select the finest graphics card for your desktop computer that satisfies your performance expectations, budget, compatibility requirements, and future upgradeability.
Best Keyboard & Mouse
Buying a keyboard and mouse for your desktop computer, keep the following point in mind
- Egronimics : Find ergonomics a priority to guarantee pleasant and efficient usage. Look for keyboards that have a good layout, adjustable height, and wrist support. Choose a design for mouse that fits your hand properly, decreasing strain over long periods of use.
- Conectivity : Explore the connectivity options that suit your needs. Wired keyboards and mice provide a dependable and immediate connection via USB or PS/2 connectors. Wireless alternatives enable mobility and flexibility, connecting via Bluetooth or RF. Select the connectivity type that best meets your requirements.
- Build Quality : To ensure longevity, use keyboards and mice with sturdy construction. Look for keyboards with a solid construction, long-lasting key switches, and fade-resistant keycaps. Choose mice with strong switches and a sturdy design that can survive repeated use.
Consider these factors when shopping for a keyboard and mouse that focus on comfort, provide a dependable connection, and are constructed to last, increasing your desktop computing experience.
Monitor (L e d )
A monitor is a display that allows you to communicate with your computer visually. It displays the data, photos, and videos generated by the linked device visually. Monitors are a variety of sizes, resolutions, and panel types, and they play an important role when using a computer.
Purchasing a monitor, consider the following key points:
- Display Size and Resulation : Choose the best size and resolution for your needs. Larger screens enable deeper experiences, while higher resolutions such as Full HD 1920×1080 or 4K 3840×2160 provide clear and more detailed pictures.
- Panel Technology : Choose a panel type based on your needs and preferences. Twisted Nematic (TN) panels provide fast response times for gaming, In-Plane Switching (IPS) panels have accurate colors and broad viewing angles, and Vertical Alignment (VA) panels combine the two.
- Refrash rate and Reponse Time : Pick displays with higher refresh rates (e.g., 144Hz or 240Hz) and lower response time for playing games or rapid-fire content to ensure clean and fluid graphics without motion blur or ghosting.
- Connectivity and Features : Examine that have various ports for connecting your devices, such as HDMI, DisplayPort, or USB-C. Select added convenience, and look for integrated speakers, USB hubs, and ergonomic stands.
- Brand Repudation and Review : Investigate reputable brands known for their high-quality monitors and customer service. Read reviews and user feedback to obtain insight into certain models’ performance, dependability, and customer happiness.
- Create a budget for what you can spend. Monitors are available at various price ranges, so consider the features and specs that are most important to you within your budget range.
Cables and Connectors
Cables and connectors are critical components in the construction of a computer. They provide numerous components such as the motherboard, storage devices, graphics cards, and peripherals to be connected. SATA, power supply cables, PCIe, or USB connections are common types that allow for simple data transfer, power delivery, and peripherals connectivity in a functional computer system.
Wifi Adapter ( Optional )
Wifi Adapter is a externel internet connectivity device for desktop computer when avaliable wifi or hotspot network .
Choose the following considerations in mind when purchasing a Wi-Fi adapter:
Compability : Check that the adapter is compatible with your computer’s operating system and has the appropriate interface USB or PCIe for your system. Check with the required Wi-Fi standards 802.11ac or 802.11ax for best performance.
Spreed and Range : If you want rapid and reliable Wi-Fi connections, look for adapters with high speeds and long-range. Consider adapters with greater Mbps speeds and features such as extra antennae or beamforming technology for better coverage.
Security Features : Set priorities adapters with strong security capabilities, such as WPA2 encryption or support for future protocols like WPA3. Enhanced security methods aid in the protection of your wireless network from unauthorized access and the privacy of your data.
By taking these factors into account compatibility, speed and range, and security features you can select the best Wi-Fi adapter for your computer system, ensuring reliable and secure wireless connectivity.
UPS ( Uninterruptible Power Supply)
A desktop computer UPS (Uninterruptible Power Supply) is a necessary equipment that provides backup power during power outages and protects against power fluctuations. A dependable UPS can provide you piece of mind by preventing data loss and shielding your computer equipment from power outages.
Consider the following for purchaseing UPS
- Power capacity : Calculate the power capacity (measured in volt-amperes or VA) required to support your computer system. Calculate the overall power usage of your computer, including the monitor and other peripherals, to ensure the UPS can handle the load and offer sufficient backup power.
- Battery Runtime : Take along the UPS’s battery runtime. Look for a UPS with enough duration to keep your computer working during power failures, allowing for correct shutdown or job continuation without data loss. Longer runtime is especially important for essential duties or when power outages occur frequently in your location.
- Surge Protection : Make sure the UPS has surge protection to protect your computer from power surges and voltage spikes. Look for Automatic Voltage Regulation (AVR) capabilities, which stabilise incoming voltage and safeguard sensitive components from damage.
- Brand and review : Investigate valued brands known for their dependable UPS systems and customer service. Examine client reviews and feedback to determine the performance, dependability, and customer happiness of certain UPS models.
By taking these criteria seriously, you may select the best UPS system for your personal computer that provides reliable electrical backup, and surge protection and matches your individual requirements.
Speaker ( Optional )
When purchasing computer speakers, consider sound quality for an immersive audio experience. Choose the connectivity options that best fit your computer’s audio output, such as USB, 3.5mm audio jack, or Bluetooth. Additionally, think of speakers that match your desk space and style while providing the desired audio performance.
2. Prepare For Assamble a Compiuter
There are a few things you need do to prepare before you begin constructing your computer. Make sure your workspace is clean and dimly lit with enough area to move around. A solid table or workstation to place your computer on is also required and ground your self .
Gathering The Computer Components For Assamble List below
- CPU (Central Processing Unit) ( Ex. i3 12100 12th gen LGA1700 )
- Motherboard ( Ex. Gigabyte H610MH DDR4 )
- RAM (Random Access Memory) ( Ex. 8 GB DDR4 Starlite)
- Storage ( HDD or SSD or M2 SSD) ( Ex. WD 480GB )
- Graphics Card (optional)
- Power Supply Unit (PSU) (Ex . Intex 450w Power Supply )
- Case ( EX Intex Cabinet)
- All contivity cables ( Sata cables, Power cables )
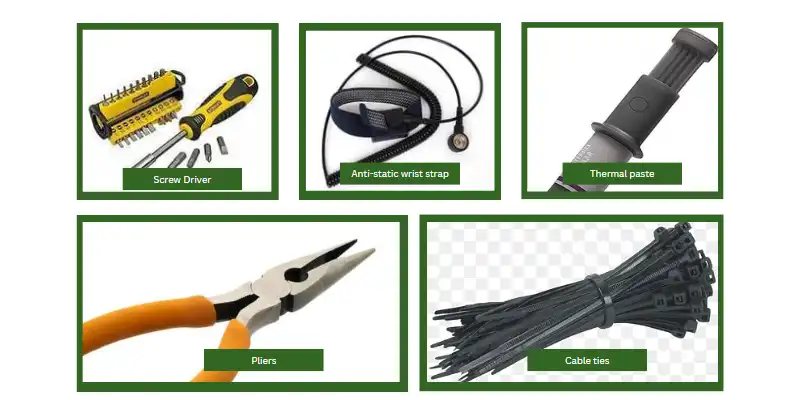
Gathering the tools for Assamble
- Screwdriver
- Anti-static wrist strap
- Cable ties
- Thermal paste
- Pliers
Now time to Assamble or Building Your Computer
Now that you have gathered your components and set your workspace, you can begin Assembling your computer. Below is a tutorial step on the assembly process.
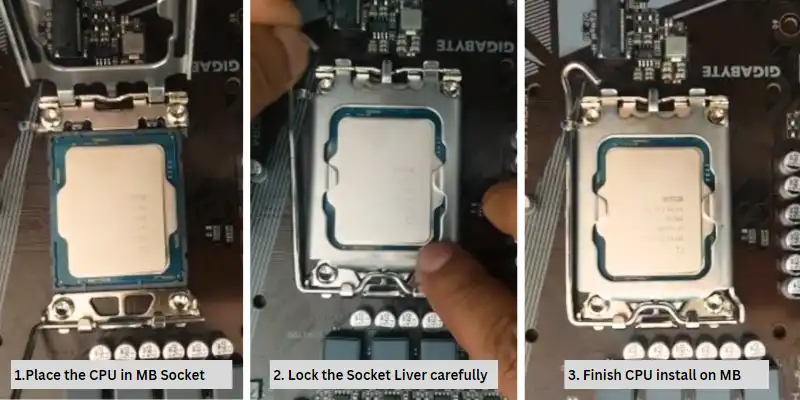
Step-1 : Installing the CPU ( Processor )
The first step is installing the CPU ( Processor ) ,Below how to do it
- Open the CPU socket carefully on the motherboard.
- Align the correct notches on the CPU with the notches on the motherboard socket.
- Gently place the CPU into the socket.
- Close the MB CPU socket lever to secure the CPU in place carefully.
Step-2 : Installing the CPU Cooler
The Second step is installing the CPU Cooler ,Below how to do it
- Apply a small amount of thermal paste to the CPU’s center. ( New Cooler already Pre ready tharmal paste in Cooler Heat Sink )
- Using the included screws or brackets or hand, secure tight the CPU cooler to the MB CPU socket.
- Connect the CPU cooler fan wire connection to the motherboard’s CPU fan header.

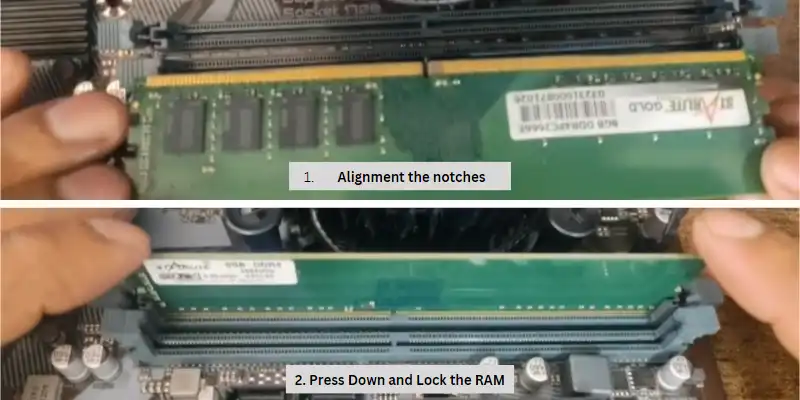
Step-3 : Installing The RAM ( Random Access Memory )
The Next step is installing the RAM ( Random Access Memory ) ,Below how to do it
- Locate the RAM slots on the motherboard.
- Align the notches on the RAM with the notches on the motherboard slot.
- Gently connect and press down on the RAM until it clicks into place.
- Repeat same for any extra RAM modules.
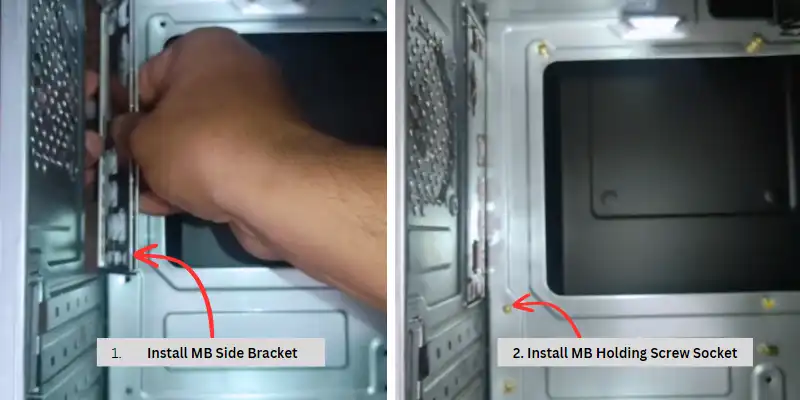
Step-4 : Open Case or Cabinet and Install SMPS
The Next step is installing the SMPS and connect Fronpanel Connection ,Below how to do it
Many case or cabinet come With SMPS or Without SMPS , If you already have install with SMPS or PSU cabinet don’t need install SMPS. But If you have only cabinet install SMPS Below Process.
- Locate the PSU Or SMPS bracket in the casing.
- Place the PSU Or SMPS in the bracket and align the screw holes.
- Screw the PSU Or SMPS into place.
- Connect the appropriate cords from the PSU Or SMPS to the components.
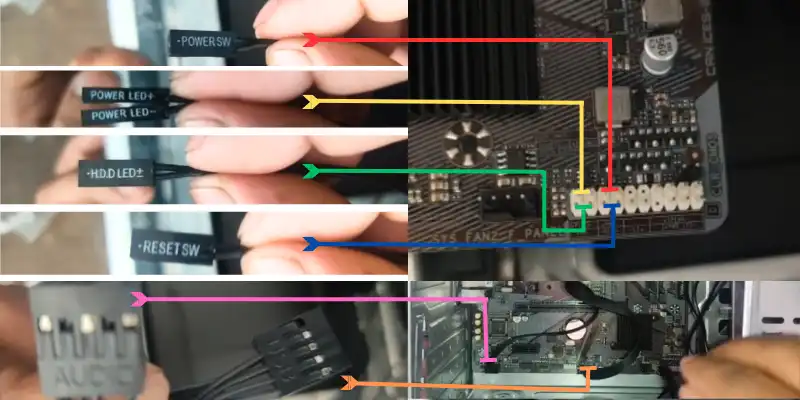
Step-5: Installing The Front Panel Connection Into the Motherboard
To insert the front panel connections into the motherboard in the correct order:
- Locate the front panel connectors.
- Find the front panel header on the motherboard.
- Match and connect connectors to pins.
- Connect Power switch, Reset switch, Power LED, HDD LED, USB and audio.
- Check the connections and run the front panel functions.
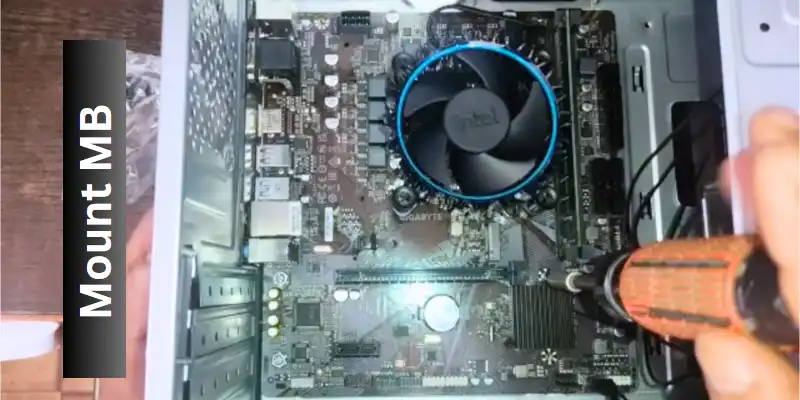
Step-6 : Mount the Motherboard in to the Case or Cabinet
It is now time to install the motherboard. Before you put it together, make sure those standoffs are aligned with the screw holes on the motherboard. The motherboard is then screwed in. Make sure not to overtighten the screws as this could cause harm to the motherboard.
- Prepare a case or cabinet.
- Align the motherboard to the mounting holes.
- Place the motherboard in the casing.
- Fix with screws or standoffs.
- Check for secure installation.
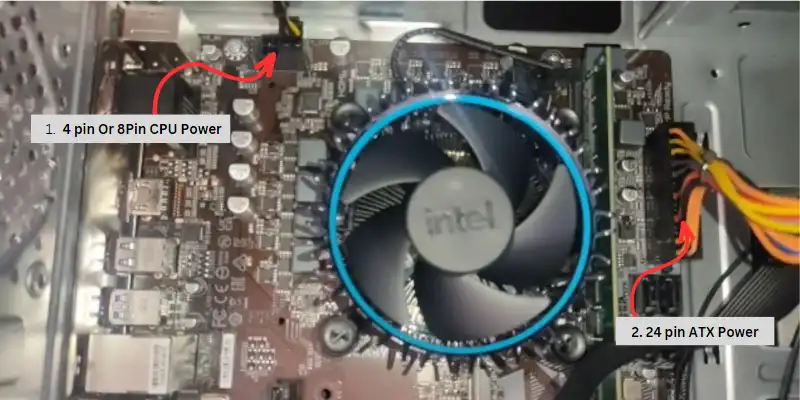
Step-7 : Connection the SMPS Wire into Motherboard
Now Connect the SMPS power into the Motherboard Power socket
- Connect the SMPS power line to the motherboard.
- Connect the 24 PIN ATX power cable to the motherboard.
- Connect the 4 pin or 8 pin CPU power cable to the motherboard Socket.
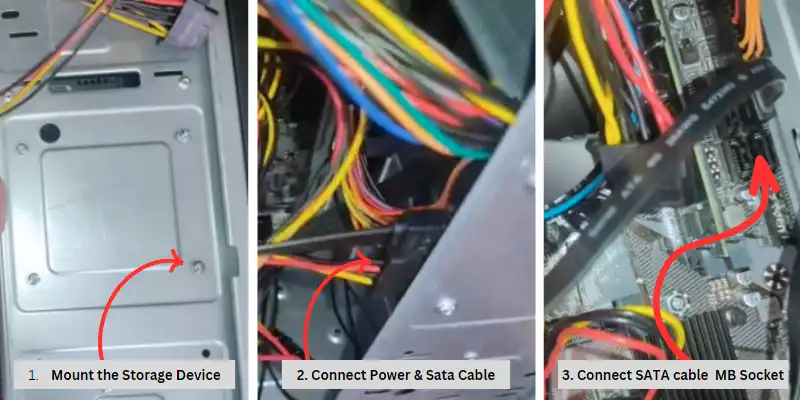
Step-8 : Installing the Storage Device and Connection in MB
The Next Step is installing the Storage Device ( SSD / HDD )
- Locate the storage bays in the case.
- Remove any necessary brackets or coverings.
- Align the screw holes and slide the storage into the slot.
- Screw the storage in place.
- Connect Sata Power Cable From SMPS to storage drive
- Connect Sata data Cable connection into the Motherboard.
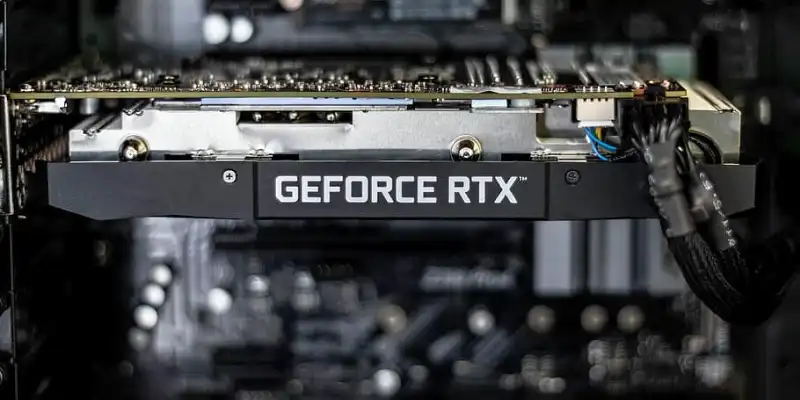
Step-9 : Installing the GPU or Graphic Card ( Optional )
When constructing a simple desktop computer, a graphics card is not required. However, if you are putting together a gaming PC or Some intel F series CPU , you’ll need a graphics card.
- Locate the PCIe slot on the motherboard.
- Remove the appropriate PCIe slot cover from the case.
- Align the GPU with the PCIe slot.
- Gently press down on the GPU until it clicks into place.
- Screw the GPU into the casing.
Step-10 : Powering On Your Computer
After completing the assembly of your computer, Now time to turn it on for the first time. Here’s what you should do:
- Connect the power cord from the power supply to a power outlet.
- In the case, press the power button.
- If everything is in order, you should see the BIOS screen appear.
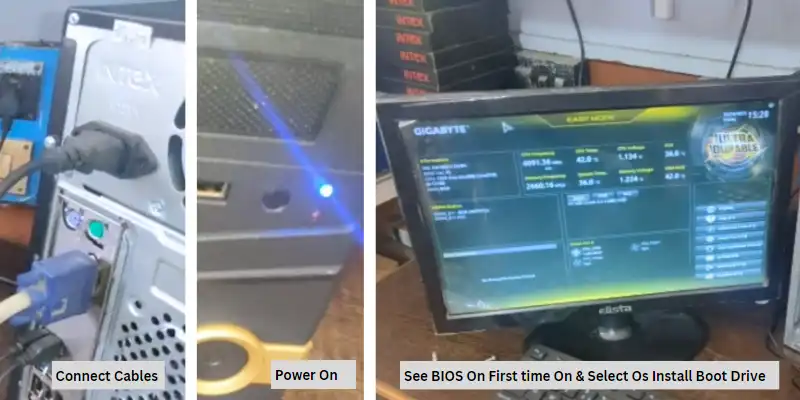
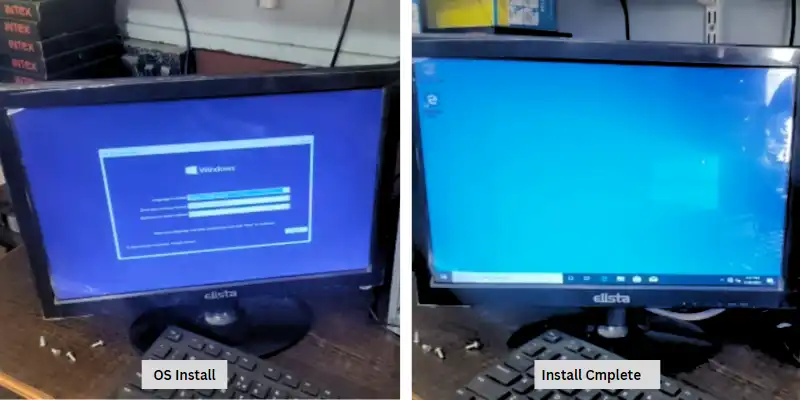
Step-11 : Installing Your Operating System
Now that your computer is running, the next step is to install an operating system using bootable Os Pendrive
- Insert OS installation media (such as a USB drive ) into the proper USB Port.
- Restart your computer. and Press the boot key and select boot drive and press enter.
- Install your operating system by following the on screen directions.
Step-12 : Installing Required Drivers and Application Software
Now the last and Finish step confiuge Bios as your required and Installing drivers and Appliation Softwares.
- Download the most recent drivers from the manufacturer’s website.
- Install each component’s drivers.
- Install All required Application Software .
Testing and TroubleShooting
After assembling your computer, test it to ensure that everything works properly.
- Turn on the machine and examine the proper BIOS settings.
- Run hardware diagnostics software to look for any problems.
- During the boot process, look for any error messages appear or ok.
- To find any problems, test each component independently.
If you run into any problems during the testing procedure. There are several troubleshooting you can take to fix the issue.
- Check all connections to ensure they are secure Connected.
- Re-set any loose components.
- Check the BIOS settings to ensure that everything is set correctly.
- Update drivers and firmware for any components that are causing problems.
Conclusion
Building a computer may be difficult at first, but with the correct components, and tools, it can be a fulfilling experience. By following the steps above given in this article, you will be a way to build your own personalized computer.
FAQs
Can I upgrade my computer after assembling it?
Yes, you can upgrade your computer after it has been assembled. The procedure can vary based on the component having updated.
How long does it take to assemble a computer?
The time to assemble a computer varies depending on the complexity of the build and the skill of the assembler. A computer can be assembled in one to three hours on average. This procedure entails installing the motherboard, CPU, RAM, storage devices, power supply, and graphics card, and connecting all essential wires.
Is it cheaper to build your own computer than buying one pre-built?
Building your own computer can be cheaper than purchasing a pre-built one since you have the freedom to select cost-effective components while avoiding paying for needless features or branding. However, technical knowledge and time for assembly are required.
Can I assemble a computer without any experience?
Yes, you can put together a computer without any prior expertise if you follow instructions and directions like this one. It may require time and patience, but it is achievable.