The SMPS is one of the most important electronic devices with a wide range of uses. They are commonly found in computer systems. It manages using SMPS. A broken power supply might cause the computer and behave unusually, including not restarting, among other things, and other devices damage Like RAM and motherboard. Processor etc. In this tutorial, I will guide you through installing a SMPS on a PC.
Switched mode power supply is a device that changes the alternating current (AC) coming from the wall socket to direct current (DC) for the parts of your computer.
Switching mode power supplies are commonly used in various applications due to their high efficiency, low weight, affordable price, and adaptive technology.
Simple method to Install SMPS on Your PC
Get a computer-compatible Switch mode power supply that fits your cabinet or CPU case. Before purchasing, verify the SMPS size, power, voltage, and connectors. Ensure you disconnect all wires and attachments connected to the CPU before reinstalling the SMPS.
SMPS Install Steps
- Open Cabinet Case.
- Open SMPS Connecting 4 Screws .
- Remove all the Motherboard and other devices connection cables and remove it.
- Install Same New SMPS in proper case space and tighten 4 Screws.
- Gently Connect all the Power Connector and other devices power cables.
- Now test the Power , all ok Finally close the Cabinet case tighten 2 Screws.
1. Open Cabinet Case
When you view from the back of the CPU cabinet, it is Typically located on the right side. Obtain all the necessary tools and open the case side panel. Depending on the screws that came with the power supply, you might also need a Philips Head screwdriver to install your power supply.
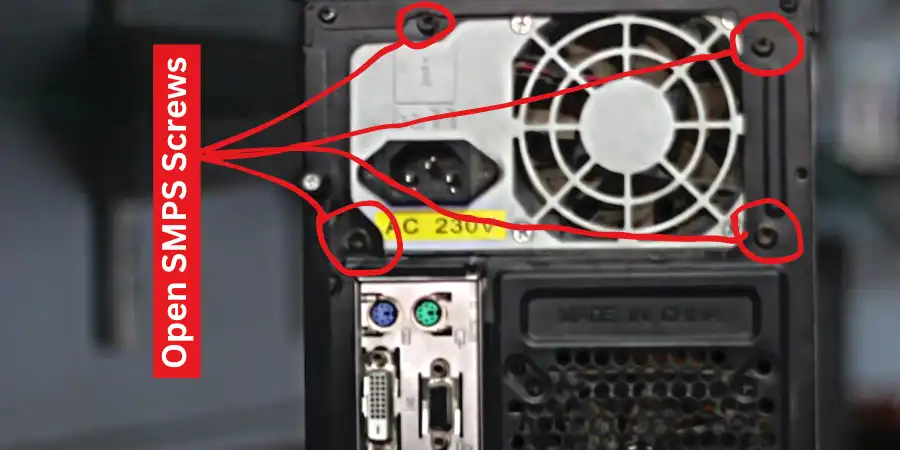
2. Open SMPS Connecting 4 Screws
Find the old SMPS by opening the case. It usually exits at the top or bottom of the casing and comes with a power cord and fan. Remove the SMPS from the case carefully. Remove the screws holding it there.
3. Remove all the Motherboard and other devices connection cables
Remove the connectors from the motherboard and any additional devices, marking them or screenshotting them if required. Later, it will be simpler to reconnect them.
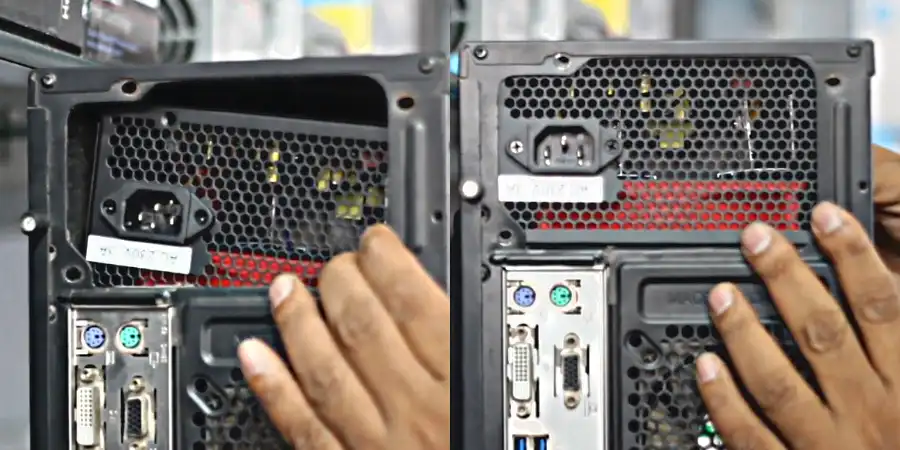
4. Install Same New SMPS in proper case space and tighten 4 Screws.
Install the new SMPS inside the casing and tighten the screw. Verify that the power cord is accessible from the back of the case as well as the fan is pointing in the proper direction. According to the labels or your SMPS manual that came with the device, Verify that none are loose.
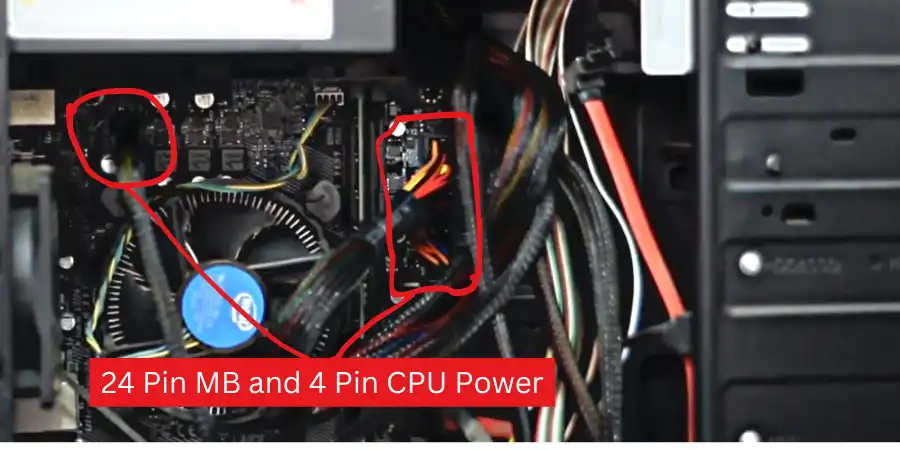
5. Gently Connect all the Power Connector and other devices power cables.
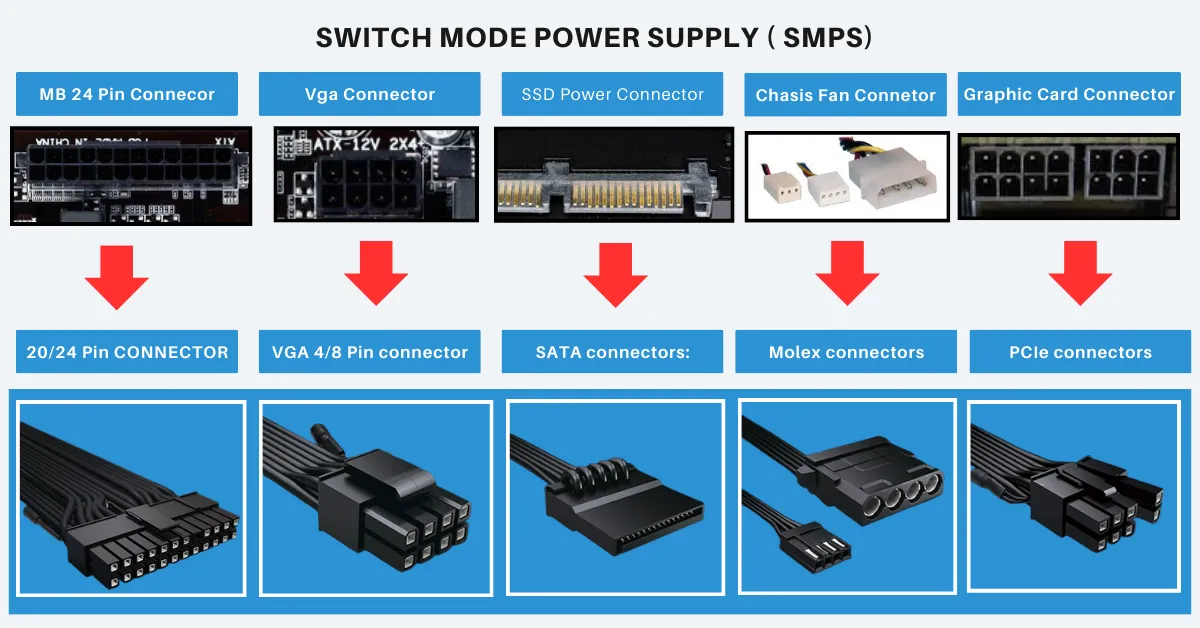
This is a list of the connections:
- Mother Board 24 Pin : One Main connector 20/24 Pins motherboard or 20 + 4 Motherboard Pin.
- Hard Drive Connector : Sata cable Connector.
- CPU or VGA Power : A single 4-8-pin ATX12V connector CPU.
- Molex Connector : Any necessary connectors for optical drives or hard drives or PATA HDD Drive.
- Graphic Card : PCI Express 6- or 8-pin video card power connector.
Locate the main 24-pin power cable on the SMPS, place it into the motherboard 24-pin connector, and then connect the other power cables to the motherboard.
Attach the power supply to your computer DVD drive, graphics card, and SSD hard drive using the smaller cables. It might be necessary for you to plug in any additional components that are part of your computer case.
- VGA or CPU 4 or 8 Pin Connector MB Socket : Use SMPS 4/8 Pin Cable connecting Pin.
- Sata Power Connector Socket : Use Serial ATA Like SSD , DVD Writer and other comportable devices.
- Molex Connector Socket : Use old Pata Hard drive now Use only Chasis Fan or use Sata converter.
- Graphic Card or Pcie Connector : Use PCI Express 6- or 8-pin video card power connector.
6. Now test the Power , all ok Finally close the Cabinet case tighten 2 Screws.
Now close your computer case and plug the power cable into the wall socket. Power up your computer and check if everything is working fine. The fan on the power supply should turn on, and your computer should generally boot if everything is connected and powered correctly.
Necessary If you hear any noises, see any sparks, or smell any smoke, turn off your computer immediately and unplug it. You have installed the Power supply incorrectly or may have a faulty SMPS.
Power Up Your Tech Game Instantly! Better Performane SMPS Check my Store at Amazon
Conclusion
For any dedicated tech, learning how to install a switch-mode power supply is essential. You can set up your power supply with confidence and provide a safe and efficient power source for your devices by following this thorough guide.
FAQs
How to install SMPS in PC ?
1. Open Case and all the Screw of existing SMPS and Internall Connetor Connection.
2. Align the New power supply Properly in case and tighten 4 Screws and Properly fasten.
3. Connect the power supply connector wires Motherboard and Other Devices Properly.
4. Close the case .
Where is SMPS located in computer ?
When it comes to a basic computer case, the power supply is situated at the back at top . For a gaming computer case, it is typically located at the back bottom.
What are the Connection of SMPS ?
P1 : Main connector 20/24 Pins Motherboard Power
P4/8 : A single 4-8-pin ATX12V CPU Power Connetor
Molex : 4 Pin Uses Pata hard drive and Optical drives
Sata Connector : Sata cable Power Connector.
Graphic card : 6 or 8 Pin Power connector.
How do you cheeck SMPS with wire without Install ?
One end of the cutting small wire was inserted into the green terminal and the other end into the black terminal. With the wire inserted turn on . The SMPS now running. If it does not turn on, Properly place the wire and try again.