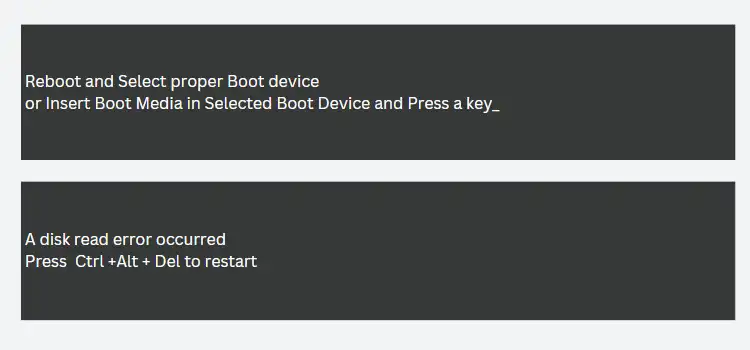
Suddenly when turning on your computer you see “Reboot and Select the Proper Boot device” or “A disk read error occurred” on the monitor screen, it indicates that your computer cannot find a hard drive that the windows Operating system contains. Restarting your computer doesn’t fix the problem, same but how do you fix it?

The problem may occur due to an error in the hard drive or missing Windows files or boot order settings in the bios. The most common reason for this is that you have an incorrect boot order set in your bios settings. This is easy to fix.
In this post, I have listed some solutions to this problem. We will start with the most common problems and solutions, follow the article below and try the solutions.
Understanding the basic Error
‘Reboot and select proper boot device error ‘ usually occurs when the computer is powered on and cannot find a bootable device that loads the operating system and ‘A disk read error occurred‘ usually indicates a problem with reading data from the hard drive. These problems can be caused by a variety of factors, including incorrect boot device order, disconnected boot drives, corrupted Windows files, faulty hard drives, outdated BIOS or drivers, and more.
How to Fix ‘Reboot and Select Proper Boot Device error’ or ‘A Disk Read Error Occurred
When we have such problems, we quickly get frustrated, what is wrong with the system, and how will it be fixed? Below are some common troubleshooting steps you should be able to resolve the issue.
1. Checking Boot Device Order and Fix It
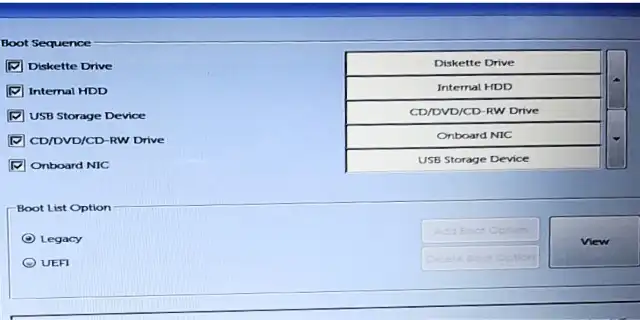
The first step in troubleshooting errors is to make sure the boot device order is set correctly in the BIOS settings. Access the BIOS by restarting your computer and pressing the appropriate key as prompted (eg, F2, Del, Esc). Navigate to the Boot or Boot Priority section in the BIOS and set the boot device order to boot first to the drive where your operating system is installed.
The problem is usually caused by an incorrect boot order in the BIOS. The BIOS allows you to specify which device your computer should try to start from first. These can include many gadgets such as:
- HHD / SSD: Contain Operating System Always Stay First to Avoid boot error.
- USB HDD: Used Install OS through Bootable Pendrive
- CD/DVD/ RW DRIVE: Used Instal OS Using Optical Drive
- NETWORK: Install Using Network
- Other Devices
Note: If there are many HDD drives and SSD installed then open the other hard drive and DVD drive except the system-installed drive and restart the system to see if it is booting or not. If not, then there is a problem with the system drive, you can install a good cheeked drive and change it if necessary.
2. Checking Ram, Boot Drive HDD/ SSD Connection
Usually indicate a problem with the connection between your computer’s RAM (random access memory) and the boot device. Sometimes this problem can occur due to a loose connection of the OS install drive, or motherboard connection.
Open your computer’s cabinet and remove and clean the RAM, making sure the boot drive is connected correctly. If there is dust, reset if necessary by cleaning the connector dust and cleaning the connector pins with a rubber or cleaner, and restart your computer to check if the problem is solved.
I. Checking RAM Connection ( Random Access Memory )
Make sure the RAM is properly seated in the slot on the motherboard. RAM modules can sometimes become loose due to movement or dust accumulation. Try resetting the RAM modules by opening them up and cleaning the pins with a bobber and reinserting them firmly and checking.
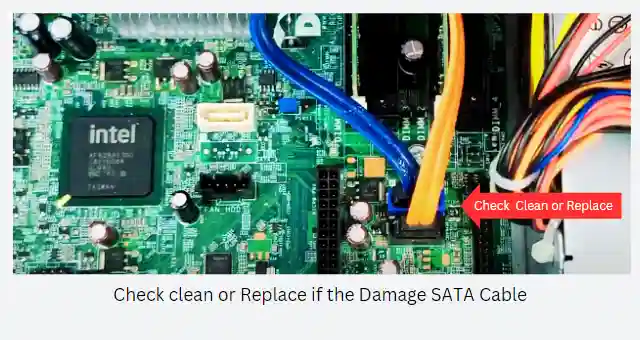
ii. Checking Boot Device Connection
Verify that the cables connecting your boot device (eg, hard drive, SSD) to the motherboard are securely plugged in. If the connections seem loose or dusty, disconnect and clean the cable, Pins or try reconnecting a new cable, making sure they are properly Inserted into a slot.
3. Running Windows Repair Tool
Windows has a tool called Startup Repair that can fix common related problems. Now you insert the installation media like USB or DVD into your windows and boot. Then select the option to repair the computer and select the startup repair tool. Follow the on-screen instructions to diagnose and repair any problems with the Windows boot process.
Step i: Create a Bootable USB Drive
To use the Windows Repair Tool you must first create a bootable USB installation drive. You can do this by following the steps given below.
- Insert a blank USB Flash drive into your computer
- Download the Windows Installation Files Use a reliable tool, such as Rufus Tool or Windows USB/DVD Download Tool, to create a bootable USB drive with the Windows Iso file.
Step ii: Set First boot, Bootable Windows USB Drive
Once you created a bootable drive now Set it to Fast boot using Bios Setup
- Insert USB Media into the USB port on your Computer
- Restart Your Computer
- During the boot process, press the proper key (typically F2, F10, or Delete) to enter the BIOS configuration. The key may differ based on the brand and type of your machine.
- Navigate to the Boot settings menu in the BIOS setup and adjust the boot priority to boot from the USB drive first.
- Save the changes and Exit the Bios Setup.
Step iii: Run Windows Repair Tool
- After Successful Booting YouSee “Press any Key to boot From USB Drive….” Press Enter
- Wait some time, after Processing You See the Install Dialog Box Of Windows Setup
- Click On Next and Then click on “Repair Your Syatem” left bottom side of the Windows Setup Dialog Box.
- Next, Choose an Option TroubleShoot and click on It
- Now Choose Advance Option Repair Method which you need and follow the on-screen instructions to diagnose and repair.
Step iv: Choose the Repair Option
Now You can Find five Advance Repair Options to solve the issue, Click on it Which you want to repair and follow the on-screen instructions to diagnose and repair.
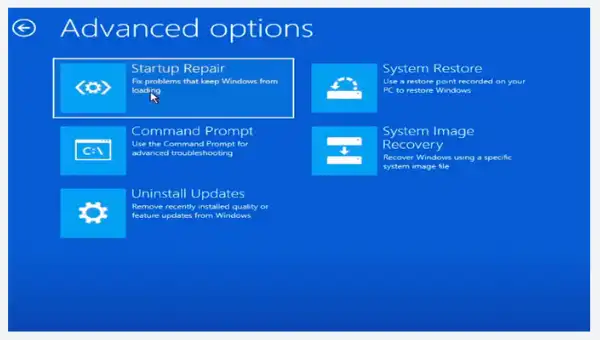
- StartUp Repair: Fix the Problem that keeps Windows from loading or booting.
- System Restore Used restore point to an earlier date when the window is running smoothly.
- Command Prompt: Use the command prompt for more advanced troubleshooting.
- System Image Recovery: Recover Windows Using a Specific system image file
- Uninstall Update: remove recent feature updates from Windows.
Step v: Reboot Your System
Your computer will restart, enabling Windows to reload the fixed system files and settings and help with solving the issues that the Windows Repair Tool was able to resolve. You can use your Windows operating system normally after the restart to see if the problems have been fixed.
4. Checking For Hard Drive Error issue
After this and if the problem appears then your hard drive may have this problem. You can use a disk-checking tool like CHKDSK or a third-party disk diagnostic tool to scan and repair problems with your hard drive. Be sure to back up your important data before running this software as it may repair or delete files.
Advance Solution
If the above solutions of the Problem ‘Reboot and Select Proper Boot Device’ or ‘A Disk Read Error Occurred’ do not solve, then a better solution may be considered.
1. Reset Default Bios Settings
If you have wrong settings in bios for some reason then this problem can also occur. For this, you enter the BIOS and set the BIOS defaults, this may solve your problem. Check your motherboard’s manual or manufacturer’s website for instructions on resetting BIOS settings.
How to enter BIOS Settings ( Example In Dell )
- Start or restart your Dell computer
- When Logo appears Press F2 Continuously to Enter the Bios setup utility. ( Key may be different for Differce System)
- Use the arrow keys on your keyboard to move to the “Exit” or “Load Setup Defaults” option once you are in the BIOS Setup Utility.
- To load the BIOS default settings, choose “Load Setup Defaults” and press Enter.
- Now Press F10 Save changes and Exit
- Finally, Exit the BIOS setup and Reboot your Dell computer.
Please note that loading default settings in the BIOS will reset all settings to their original values, which may include boot order, time and date, and other configurations.
2. Reinstalling Operating System
After that, you might need to reinstall the fresh operating system if the issue still exists. Anything stored on your computer’s “C” drive will be deleted, so make a backup of all of your crucial files before doing this. to restore the operating system using bootable DVD or USB installation media, or by utilizing the manufacturer-provided restoration methods.
3. Replacing Hardware Component
If this does not work, then it is possible that some hardware component, such as the hard drive or motherboard components, is faulty, and may need to be replaced. Consult a professional technician or your computer manufacturer for diagnosis of hardware component changes.
Importance: Now is the Day that your Hard Drive is damaged and requires a replacement new one, For better Performance you Replace Ony SSD or M2 Socket with High speed Performance.
Prevention and Maintenance
When it comes to computer various issues, prevention is always better than cure. Here are some preventative steps and maintenance techniques to keep your computer working well and avoid future boot problems.
1. Regular Cleaning and maintenance
To keep your computer clean regularly, the external and internal components should be cleaned regularly. Especially fans and vents, to prevent dust accumulation that can affect the computer’s performance and cause overheating.
i . Dusting: Dust can accumulate on computer components such as the monitor, keyboard, and CPU. Carefully use a soft, lint-free cloth or can of compressed air to clean these areas regularly.
ii. Keyboard and Mouse: Regularly clean your keyboard and mouse of dirt, debris, and debris.
iii. Screen Cleaning: Clean your computer screen using a screen cleaner or a solution of water and mild detergent.
2. Regular Backup of Important Files
Back up your important data file, folder, photo, and video regularly to an external storage device or cloud storage. So that you have a backup of your important files in case of data loss due to computer hardware failure or other problems.
3. System and driver Update when an update is available
Update your operating system, BIOS, and drivers on a regular basis when an update is available to the most recently updated versions. This is helpful in the resolution of known defects and security vulnerabilities that may result in boot problems and others.
4. Monthly Basis Disk clean up
Clean up the disk on a regular basis, if not possible then at least on a monthly basis remove unnecessary documents, temporary files, and trash data from your computer. It improves the slow performance of your computer’s hard disk and helps reduce problems.
Conclusion
Encountering problems like ‘reboot and select the correct boot device error’ or a disk read problem has occurred can be frustrating, but with the right troubleshooting steps and preventative measures, you can fix the problem and get your computer running smoothly again. Always remember to back up your important data and consult a professional technician before attempting any advanced or hardware solutions.
FAQs
What causes the ‘Reboot and Select Proper Boot Device’ error?
The ‘Reboot and Select Proper Boot Device’ problem can be caused by incorrect boot device order in the BIOS configuration settings, a loose connection of the boot drive, corrupt Windows files, a faulty hard drive, and Faulty connectivity.
How to fix a computer that says reboot and select the proper boot device?
Incorrect boot device Order, Damaged or disconnected boot device, corrupted boot sector or bootloader, unsupported boot device, Faulty Hardware, Bios Misconfiguration, and MBR Damaged are the reason for this type of error.
What should I do if the basic troubleshooting steps don’t work?
When basic troubleshooting steps do not work you can try more advanced solutions such as resetting BIOS settings, installing the operating system, or changing hardware components like the hard drive or motherboard. It is recommended to consult your computer manufacturer for further diagnosis and assistance.
How can I prevent these errors from occurring in the future?
You can prepare yourself to avoid these problems in the future by regularly backing up your important data, updating your system and drivers, and performing regular disk cleanups to optimize your hard drive’s performance.
Can I recover my data if I need to reinstall the operating system?
When Reinstalling the operating system can erase all data on your computer, so it is very important to back up your important file, folder, and data to an external storage device or cloud storage to avoid damage. But You have not backed up the data and need to reinstall the operating system. You may then be able to get some data back using data recovery software, but this is not always guaranteed.